

WebRTC is an open framework that enables Real-Time Communication(RTC), which is very useful for things like Video-Audio calling, Chatting and P2P file sharing, …
It is the open standard for real-time communication, which powers so many products and is being used in production at huge organizations. For example, Google Meet, Discord, Facebook Messenger, and many more are being powered by WebRTC. Applications like Zoom makes use of WebRTC indirectly for the data channels and stuff.
Let’s take a look at some terminologies and stuff related to WebRTC, while we learn about how it works when connecting two users for a video call.
<>IP Addresses and NAT
We all know that every device must have a unique IP address to access the internet. But what happens when the number of available IP addresses is less than the number of users wanting to use the internet? That’s exactly the case with IPv4 addresses.
IPv6 has been carefully designed to avoid these problems in the future.
But to solve this issue for IPv4, Network Address Translation (NAT) is used in the router, which uses its own set of IP addresses for the devices below it, also known as local/private IP addresses(10.x.x.x, 192.168.x.x, 172.16.0.0–172.31.255.255). Only the NAT and peers of the local network can communicate through this private address.
Thus, because of NAT, we would have two IP addresses; one being public, associated with the router, visible only from the outside and the other, being a private address visible only to those connected to the same router.
</>
It’s not possible to connect two peers directly with just their IP addresses. Most of the connections would require you to pass on a unique address to locate you on the internet, a relay server to pass on media, if your router doesn’t allow P2P connections and last but not least, you would have to bypass the firewall.
To facilitate this, a framework called Interactive Connectivity Establishment (ICE) is used to connect the end users.
THE STEPS TO MAKE A CONNECTION
We need to pass on some information back and forth between the clients before a direct connection can be established. That’s exactly the reason why WebRTC is not fully P2P.
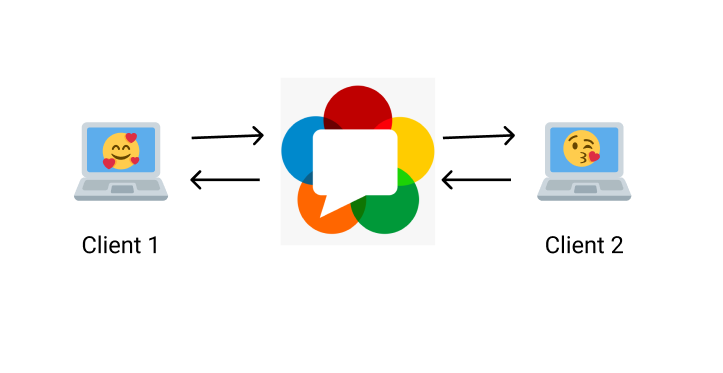
In order to initialize a connection, a signaling server is required to transfer some essential information between the peers. Once the connection is established, we won’t require the signaling server thereafter.
Let’s look at the steps we need to do during signaling now.
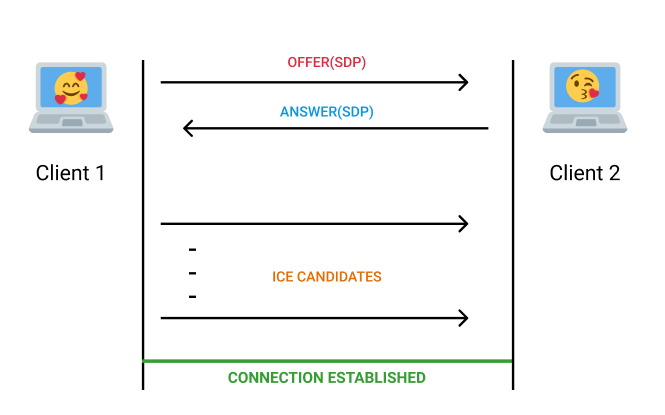
The first user has to send an OFFER SDP to the other user.
The second user has to accept that SDP and send an ANSWER SDP in return.
Then, the first user should accept that SDP and after that either one of them has to send the ICE CANDIDATES generated, to the other.
The latter has to accept the received candidates.
After doing all these, the connection will be established.
But now you are confused about what an SDP is, and what an ICE Candidate is, right? Don’t worry.
<>Session Description Protocol(SDP)
Session Description Protocol or simply SDP is a protocol for describing multimedia sessions. Normally, it contains a description of the multimedia content of the connection, such as resolution, formats, codecs, encryption, and others. This is transferred so that the other peer can know about what and how the media will be sent, before connection establishment.
So, transferring SDP means that you are telling the other user about what you are gonna be sending, after the direct connection(P2P) has been established.
</>
Now, before we take a look at what an ICE Candidate is all about, let’s try to understand more about how the connection is made with the ICE framework.
Let’s try out some scenarios for a WebRTC video call.
Scenario 1: Both users connected over a local network:
If both users are on a local network, then there’s no problem connecting with each other. They can communicate directly with each other, with just their local/private IP address. But mostly, it’s an unlikely-to-happen scenario.
Scenario 2: Both users connected over the internet:
When both users are not under the local network, the connection becomes a little complicated. As the user can only see his private IP address due to NAT, a connection cannot be established from outside the local network.
In order to overcome this, we use a STUN server.
<>Session Traversal Utilities for NAT(STUN)
The STUN server allows clients to find out their public IP address and the type of NAT they are behind. This information is used to establish the media connection later on. In most cases, a STUN will be necessary to facilitate a connection.
By making contact with the STUN server before sending the SDP, one can connect with the other user, even if they are not on the local network.
</>
Scenario 3: Both users connected over the internet but a direct connection is not possible:
One may think that using the STUN server would solve all the problems for the connections through the internet. Knowing the public IP address is great, but it might not be enough for the connection to be established. There are cases where a direct connection is not possible at all.
Around 80% of all connections can be resolved by either using the local IP address or by the use of STUN and public IP addresses.
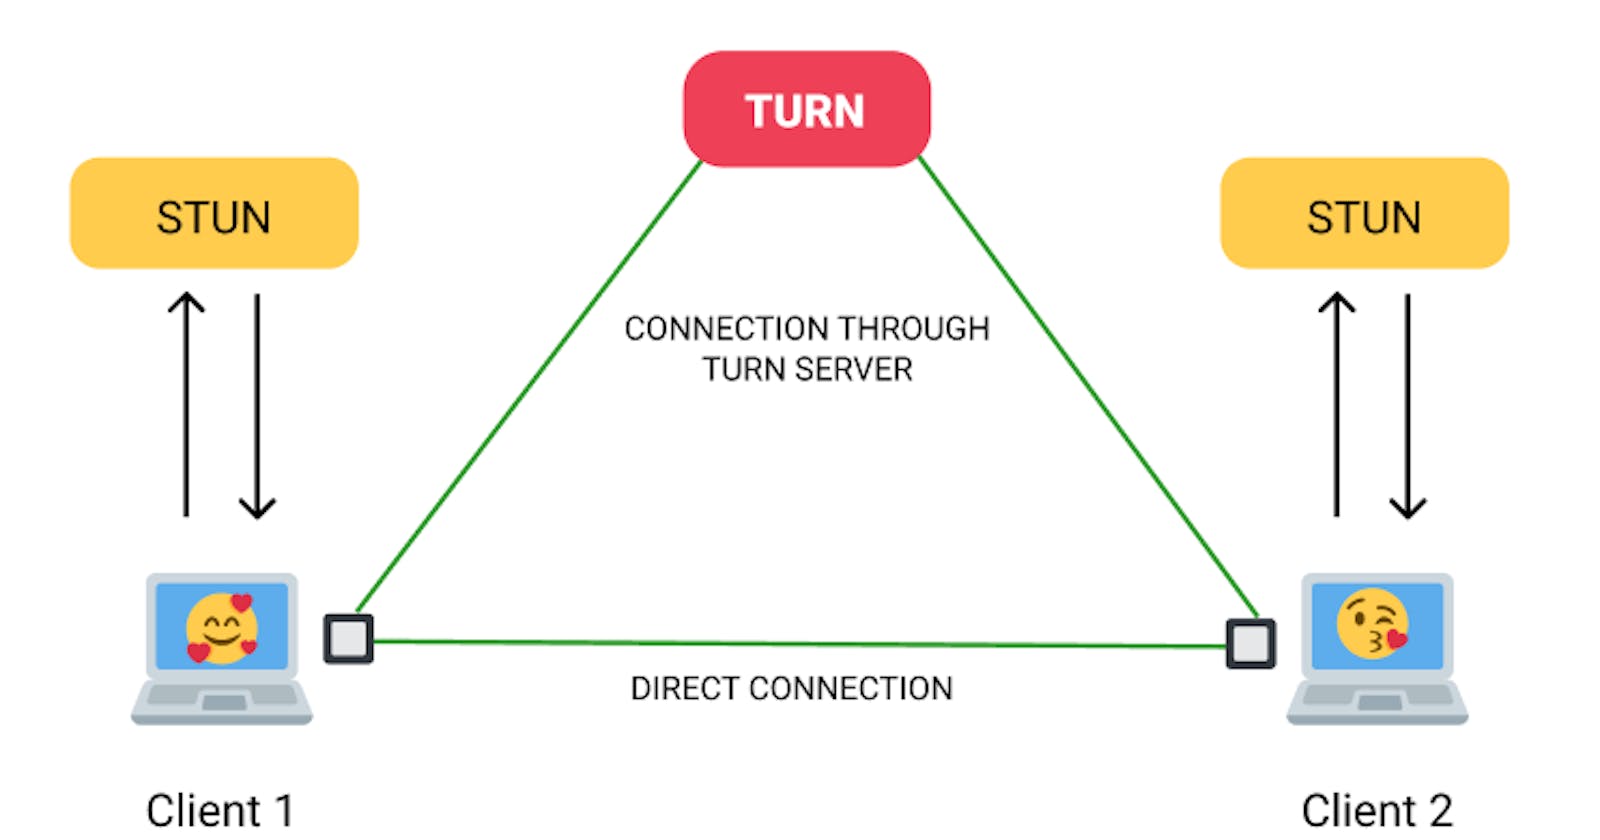
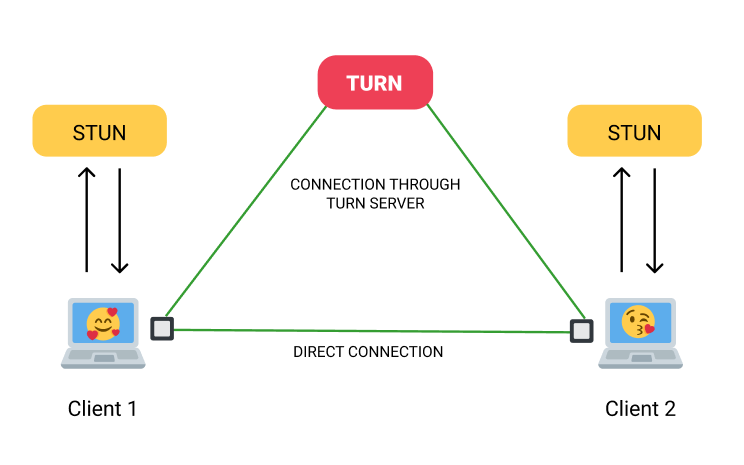
Some of the cases might be; one of the peers is behind a Symmetric NAT(a more secure type of NAT) or simply that the firewall doesn’t allow P2P connections to be made. In these situations, we need a server to relay the media between both the peers throughout the connection, unlike a STUN server, which is only needed once before the connection is established.
What we use here is called a TURN server.
<>Traversal Using Relay NAT (TURN)
A TURN server is used to bypass the Symmetric NAT restriction and relay all information/media through that server. The first peer has to create a connection to the TURN server and ask the other to do the same so that all the information the other peer sends to the server is forwarded to the former.
TURN servers usually come with their own STUN servers integrated, so an additional STUN server is not necessary. TURN servers are often referred to as ‘Relay Servers’.
As you probably know, TURN servers usually are expensive to maintain due to their relatively high bandwidth usage. So, it should only be used in cases where no other means of connection is possible.
</>
Now you may think that there are so many things to look at, before making a connection. So, how is it possible to always use the efficient path to communicate?
This is where the ICE framework jumps in. WebRTC finds the most efficient network path for the connection to be established.
<>ICE Candidate
Just like how SDP is used to exchange information about the media, peers must also exchange information about the network connection. This is what an ICE candidate is for. They contain all the details about the available methods to communicate, like a direct connection or through a TURN server.
ICE candidates are generated automatically by the WebRTC framework itself, and should be sent to the other peer via signaling as soon as possible to get the best connection route possible.
The received ICE candidates should be accepted only after an OFFER/ANSWER exchange has happened. And handling the ICE candidates is the place where one would find issues working with WebRTC most of the time.
</>
And thus, a successful peer-to-peer connection has been established in WebRTC.
If you found this material useful, please don’t forget to Clap 👏 and share it with your fellow mates. If you found something wrong or misleading in the material above, kindly leave a comment.
If you want to support me, you can buy me a coffee on

You can connect with me on LinkedIn, follow my works on GitHub or send me a mail.